A few days ago, I shared my reasons for making homemade dog food
here. Today I will share Make Homemade Dog Food ~ Part Two!
A few points about making homemade dog food:
Talk to your vet first! Your vet knows your dog and his specific needs, I don't.
Go to the ASPCA website for a
list of foods that are poisonous to your pet.
I cannot stress enough how important this is. Many dog food recipes on the web cannot be trusted to adhere to this list,
always check this list against any recipe.
Have fun, and if your pet turns up his nose at your cooking (a serious ego blow, I can tell you) keep trying. Fido may hate broccoli, but love peas. Some experimentation may be necessary.
Homemade dog food should include:
40% meat (protein), 30% veggies, and 30% carbohydrates.
Some websites suggest:
40% meat (protein), 50% veggies, and 10% carbohydrates.
(This is why you need to talk to your vet! Different breeds need different ratios.)
I am still learning and adjusting the ratios of my ingredients. The recipe I am sharing with you is roughly 40% meat (protein), 25% veggies, and 35% carbohydrates. I have since started cutting back the
carbs and have increased the protein and veggies. It is an ongoing process, but really not as difficult as it may sound! I know that
my food is much healthier than store bought kibble, so I am confident that I am taking good care of my doggies even if I need to adjust my recipe as time goes on. (In fact, I found a new recipe today that I plan to try, I will share it with you at the end of this post.)
My recipe changes almost every time I cook dog food, it all depends on what I have on hand. The most important thing to do is stick to the correct ratio of protein/veggies/
carbs and of course to use foods that dogs can eat. I have a printed list of
poisonous foods on my fridge that I reference any time I change up the recipe. The recipe I am sharing with you can be changed to fit what you have already or what is on special at the store - for example, I have used ground turkey, chicken, ground beef, bacon, and eggs as my protein source. If I have meat that we planned to use, but didn't, it goes into my dog food instead. I virtually never have wasted food anymore!
Whew! Let's get on with the tutorial, shall we?
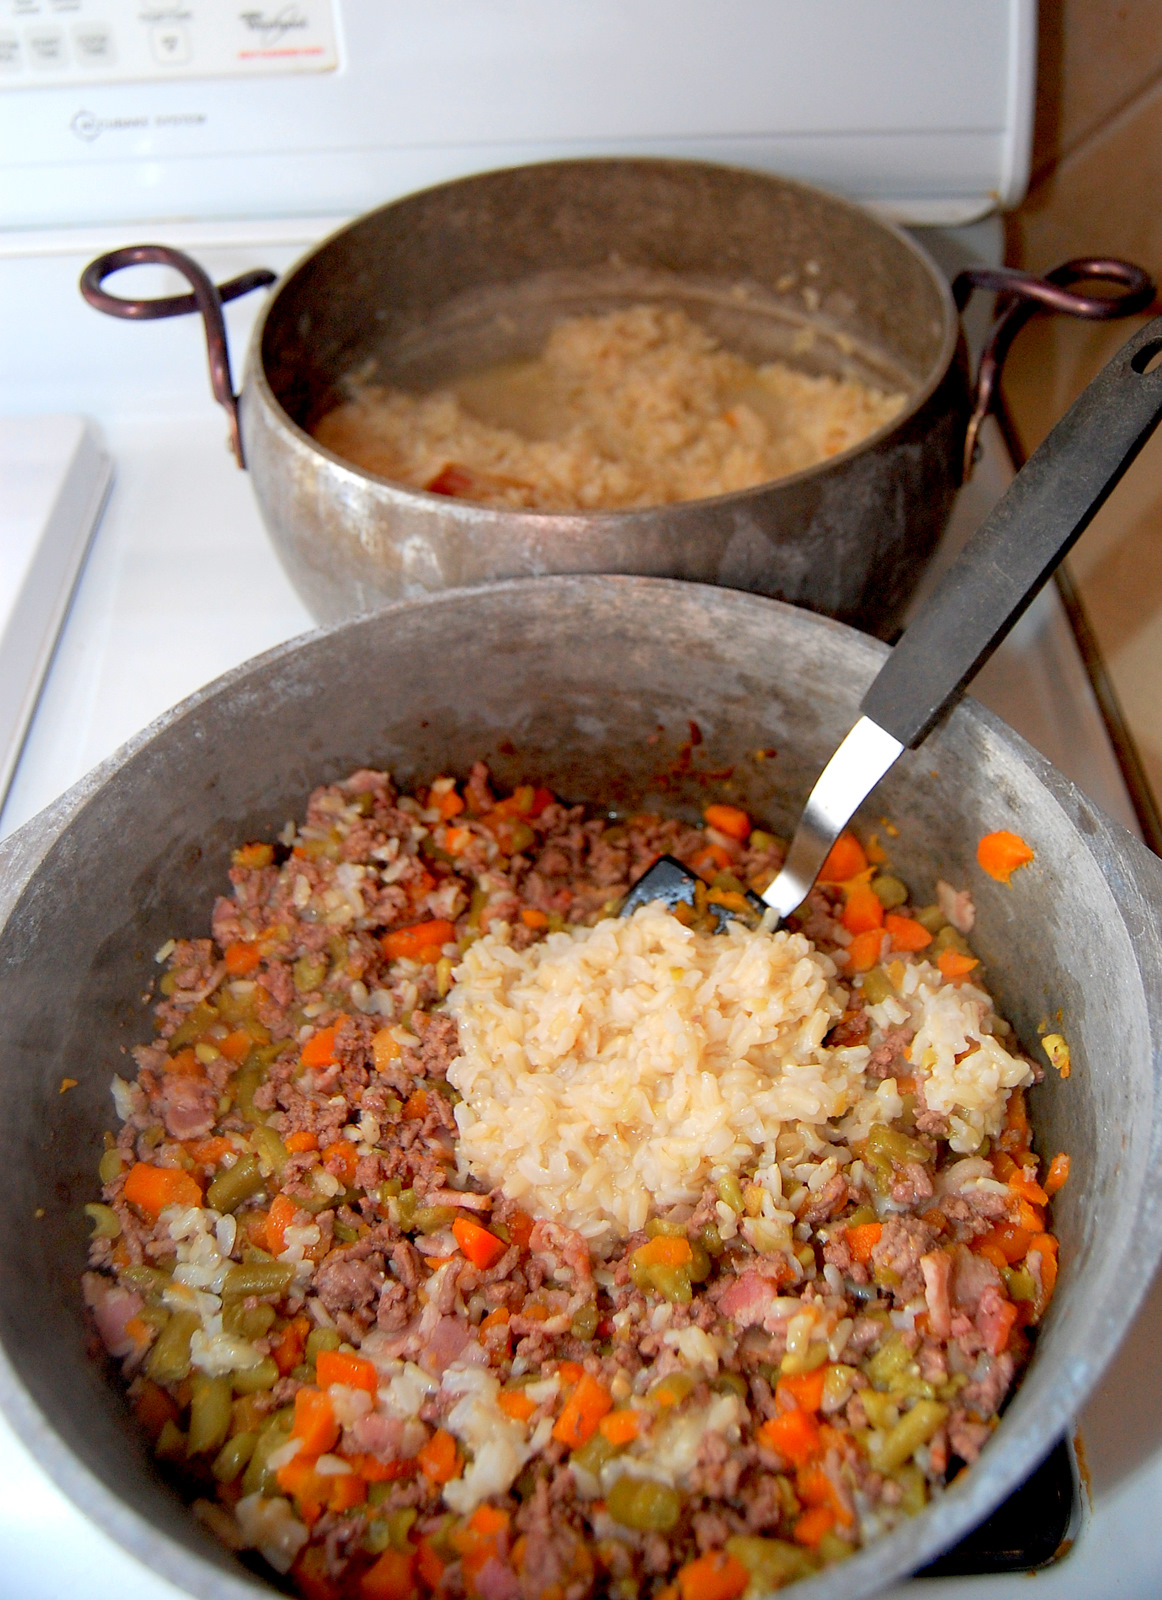
Ingredients: brown rice, olive oil, fish oil, canned green beans, canned carrots, ground beef, and bacon:
(the pots I use are vintage, one from my Grandma and one from my Momma. They are well used, so they don't look pristine. I promise they are clean!)
Boil water with 3-4 tablespoons of olive oil, add brown rice, and cook until VERY soft (overcooked, really.) Add more water than you think you need, the rice should be runny and moist. When it's almost done, add 2-3
fish oil capsules (these are good for people too!)
The olive oil and fish oil are good for the eyes, fur, digestion, and heart. The fish oil has the added benefit of flavoring the rice. (When I cooked this meal, I added a piece of bacon to the rice for flavor as well.)
Cook the beef and bacon thoroughly. NEVER give your pets raw or undercooked food.
It's better to overcook than undercook.
Bacon is fatty, so I rarely include it in my dog food. We had about three pieces leftover that wasn't going to be used, so I tossed it in. I made sure to drain the fat and rinse the meat well after it was cooked.
Once your meat is cooked, turn off the heat and add green beans...
and carrots...
Cut them up into the meat.
The remaining heat from the meat will "steam" the veggies. Overcooking the vegetables will reduce their nutritional value. You can use fresh or frozen veggies as well, simply steam them lightly or add them in with the meat and cook until they are soft enough to break up.
All mushed up! YUM!
Spoon in your rice...
and mix it all up!
I then transfer everything into a plastic container that fits well into my fridge.
The extra water from the rice provides plenty of moisture, and after it sets up in the fridge, it will be easy to serve to your dogs! (I used to heat up their bowls of food in the microwave until just warm, but that was tedious and my dogs seem to prefer it cold for some reason.)
My puppies were giving me the "I'm starving" eyes, so I dished it up as soon as it was cool enough to eat. My dogs are all around 25lbs, so I give them about a 3/4 cup or so each.
I will be hosting a giveaway of this FANTASTIC product soon!
It has made a HUGE difference in my pet's breath and dental health - no kidding.
One little scoop...
Sprinkled over the food...
Be sure to count your fingers after you set the bowls down, because your dogs will be gobbling everything up!
nom nom nom
I have three dogs, and I feed them twice a day, so we go through one container of food every 3-4 days. Food can be prepared in larger amounts so you don't have to cook as often, but if you aren't going to use it in 3-4 days, freeze it. This food freezes beautifully! Just pull out the frozen food and leave it in your fridge overnight and it should be ready to serve by the next morning.
Here are some of the other ingredients that I have used in my homemade dog food:
Whole wheat pasta
Eggs
Ground Turkey
Chicken
Broccoli
Peas
Cauliflower
Steak (we froze it and the hubby wasn't too excited about grilling it anymore, so, since it was still good, I used it for the dogs instead.)
Cheese (small amounts)
Spinach
Corn
Beef or chicken broth (this adds great flavor to the rice, but DO NOT use broth that has onion or garlic listed in the label. Make sure to use sodium-free broth as well, as too much salt is harmful. One trick I have used is to add chicken legs, fat and skin removed, into the rice water and boil them with the rice until fully cooked. I then remove the meat from the bone and toss the meat back in. This flavors the rice and cooks meat all in one step. Just be careful to get EVERY bone, as bones are a terrible choking hazard.)
This is not an all-inclusive list by any means! There are so many options to try! In fact, I found
this recipe today, and am eager to try it next.
I hope you enjoyed this tutorial! If you make your own dog food, or try this recipe, please let me know! I would love to hear any tips or suggestions, and I will be more that happy to answer any questions you may have!
Stay tuned for the
Teddy's Pride Probiotic Oral Care Giveaway!
I am linking to a ton of great parties, so many that I simply cannot list them all here! Pretty pretty please visit my list of Craft and Tutorial parties HERE to see all the parties I linked to! A wealth of insipration awaits you!