

Don't forget to enter my
CSN STORES GIFTCARD giveaway!
CSN STORES GIFTCARD giveaway!
In case you missed my guest post on Miss Crafty Pants, here it is for ya!
Make a fun, easy, and cheap Phone Caddy!
Sometimes when I'm frantically digging through goodies shopping at Dollar Stores, I buy stuff that I'm pretty sure I'll use in a craft project... someday. And then there are the finds that I know exactly what I want to do with them and can't wait another moment to transform them.
This is one of those finds:
This is one of those finds:

Ain't she a beauty?

In all honesty, the pictures make it look better than it does in person. It's not painted well and the image on the front is washed-out and cheap looking. Which, well, it WAS cheap. But who cares if it's ugly, we're gonna fix that right now!
Time to head out to the garage to spray paint! One last pic before the transformation begins:

Pull out that black spray paint and start spraying!

Better already. Ahhhh.
Now here's the part where I realize I forgot to take a pic of the box after it was painted. I hope the plethora of pictures to follow will make up for that.
Now that the ugly garden print is gone, let's put something pretty in it's place!
Grab some fun scrapbook paper and cut it to size!

I am in love with turquoise lately. It's everywhere these days, and I can't resist peer pressure. I am weak to the turquoise. Unfortunately there is almost no turquoise in my house. Until now! Hooray!
Another fun trend is the use of letters in decor. Again, I cannot resist. I am on the monogram bandwagon and lovin' it! So to add a letter, I found a typeface I liked and printed it on plain ol' printer paper with plain ol' ink.

Grab these tools: cutting mat, straight edge, scissors, razor blade, and a black sharpie! Cut that letter out!
While in Graphic Design school, we had to cut eleventy billion things with our razor blades. We cut out letters, shapes, mats, everything. It took a while, but eventually I became a razor blade pro! There are simple tricks to making your finished piece clean and crisp:
When cutting, don't apply too much pressure. You'll have a tendency to tense up and press down much harder than is needed for a thin sheet of paper. Light and steady is the key.
Never ever drag your blade through the paper. Cut straight down or at a slight angle. Dragging the blade even slightly from side to side will almost always cause tearing or ragged edges. Be dedicated to your cuts!
When cutting a curve, let all the motion come from your wrist, and press down a little harder, just enough to bend the blade just a little bit. That may sound crazy, but the metal of the blade is actually very flexible and will do a lot of the work for you. Let the blade slice around the curve. This may take practice, but trust me, it works.
If you need to cut a straight line, use a straight edge. Even on the itsy-bitsy straight lines. If there is a straight line that approaches a curve, cut right to the edge of the curve using that ruler! It will make all the difference in the cleanliness of your project.
Don't cut away too much of your background paper all at once. Leave some paper to help you hold the piece steady as you cut the small or tricky areas. Cut the easy stuff last, but always be gentle to avoid ripping that perfect curlicue that you just spent 15 minutes cutting.
Move your piece around! Find the best angle before you cut. Keep your arm, wrist, and hand relaxed - tensing up leads to trouble.
Use scissors to clean up any wiggles or bloopers. I like to turn my piece over - often you will see things on the backside that you won't notice right away on the front.
Cheat! Absolutely cheat! When I cut out the letter for this project, there were places you could still see the white paper around the edges of the black letter. Instead of trying to re-cut a minuscule sliver of paper off of my fragile letter, I pulled out my trusty black Sharpie and just touched up the edges. This trick SAVED MY SANITY in college.

I hope those tips help you on your next cutting project! Sorry I was long winded there.
Whew! Let's get back to our Phone Caddy!

This will be so pretty! Pull out that elixir of the crafting gods, Mod Podge!

Mod Podge the surface where your scrapbook paper will go.

Stick your paper on and Mod Podge over the surface, squishing those pesky bubbles out as best you can.

Now wait it for it to dry.
Ha.
Who are we kidding? Fidget for about 15 seconds, and stick your letter on.
Throw on another layer of Mod Podge.

Now you'll have to wait for it to dry for real, because the next step involves drilling a hole into the back of the caddy for the charger cord to go through.
Unless you planned ahead and cut it before you painted it. Which, yeah... notsomuch.
Cut a hole in the back before you spray paint your caddy.
Or do what I did, and force yourself to wait for the Mod Podge to truly dry, then wake your husband up late at night and ask him oh-so-sweetly to please come help your poor little self.
Mark the size of the hole, big enough to thread the end of your charger.

Admire your husband's sexy arms and thank him profusely for helping you.
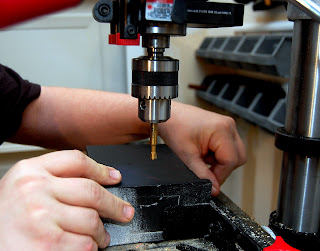


My husband used his fancy drill press, but you could use a regular drill as well. I'm sure I could have used one of our several hand drills all by myself... but I didn't want to. Just don't mention that to him, 'kay?
Check to make sure your charger will fit.

Success!

Handily, the iPhone charger is bigger at one end than the other, so the part that plugs into the phone itself will not fall out of the caddy every time you unplug your phone. I'm betting that almost all chargers are similar, so just make sure that the hole is sized appropriately.

Perfect! Good job, husband, love ya, now you can go back to sleep.
Here's the part where I almost ruined the whole piece. I decided that the scrapbook paper was a little harsh and needed some distressing. My spray paint was almost gone and was just spraying fuzzy little splatters. "Perfect!" I thought. "I'll just spray a little around the edges of my scrapbook paper, wow, this looks great, I love how this is turning out... OH NO!" The spray paint came back to life with a vengeance. Sprayed a huge solid streak across the top of the paper. ACK! I ran to the kitchen and wiped it off with a paper towel as best I could.
Fortunately, this mistake made the look SO much better! Don't you love when that happens?
UN fortunately, I was all freaked out and forgot to take pictures. Sorry.
What saved this piece was the Mod Podge. (Gotta love it.) There were several layers of Mod Podge between the paper and the spray paint, so I sanded the mess until it looked aged, instead of blobby. As I was sanding the paper, the black letter started showing the white underneath the black printer ink. It looked great, and it's something that never would have happened had I not had the spray paint blob accident. Win!
I also distressed the edges of the caddy so that white peeped through the black paint. I then gave it another coating of Mod Podge, this time over the entire caddy.
Finally, a picture!
Here is is, all finished!

Can you see the still-wet Mod Podge in the corners?
I was too eager to take pics for you! I couldn't wait anymore!


I will love having this on my nightstand! Now I won't have to worry so much about the pesky cat knocking a glass of water onto my phone. Also, with something this cute, I will (probably) remember to charge my phone more often. (Maybe)
Here's a before and after:

Much better!

I am so happy with how it turned out!

I hope you enjoyed this tutorial as much as I enjoyed making and sharing it with you!
There are so many other possibilities for a caddy like this - I am planning on making another one, but next time lining it with felt to hold a pair of glasses! It would also be great for leaving on the entry table for my husband to drop his wallet and keys into when he walks in the front door. So many crafty options for a one dollar investment!
Thank you for sticking with me to the end!
Don't forget:

My Phone Caddy Tutorial was featured on these wonderful blogs:


22 comments:
This is a great idea. I like step by step posts so thanks for that. The paper you used almost makes it look like glass. I really like it. I bought a hidden phone charger a while back and I love it. One of the best things I ever did. Never thought to make one.
This turned out great! I love the idea! Thanks for the exacto knife tips! I vaguly remember all that from interior design school (I took a ton of graphic design classes too) but the refresher is always good! And I LOVE the sharpie marker trick too! That one saved me in college too!!
Thanks for linking up!!
I loooove that! Great idea! I wish I was one of those people who could see something and automatically turn it into something else! You rock!
Wow what a transformation. Thanks for the great tutorial and for linking up to Saturday is Crafty Day!
Very cool idea! I love how it turned out!: )
Great idea! I have been looking at these in some of the catalogs. And thanks for all the photos and tips on cutting. I usually avoid cutting paper if I can. :)
Great Idea!
It turned out great! Definitely much better after, fabulous job. :-)
wow! I totally LOVE this! So smart! And so cute! Great job! :)
Thanks for your kind comment about my chunky candlestick makeover and becoming a follower! =D
Amber
This is so cool! I would love to feature this for Favorite Things Friday this week! Come stop by my blog if you would like a featured button!
Can't believe that is the same caddy! Really cool, and yes, a ton of different uses!
Thanks for linking up to "Anti-Procrastination Tuesdays" at New Nostalgia! Would love to see you again tomorrow!
What an amazing transformation! So clever and creative! Love it! Thanks so much for stopping by and joining the Sunday Showcase Party. I greatly appreciate it! Hope you have a great week! ~ Stephanie Lynn
Great project!! I super love it...and will keep my eye out for something like this to make one up for myself!
You're so talented! We'd love to have you link up at our Saturday Spotlight linky party! http://nv-craftenvy.blogspot.com
What a great idea! You are so creative!
Well, it doesn't look like it came from a dollar store anymore! I love the idea and I love that you did it inexpensively. Practical meets pretty!
No Way! This turned out so cute, I love it! I am definitely going to try this sometime! Thanks for linking up with Sweet Charli and sharing your talent!
That is great! I am so going to run over to my dollar store today. Thanks for sharing.
WOW love it love it. so creative, Thanks for sharing
Hi, Great pictures and instructions what a cool idea. A little late but I found you through the Tuesday Tag-Along over on Twee Poppets. I’m a new follower and would sincerely appreciate if you’d visit my blog. Follow if you like it: My Tot Travels
You can also find me on Twitter and Facebook
Happy Travels,
Lilli (#100 on the list)
http://www.mytotstravel.com/
My Tot Travels...
Learning to Parent on the Road of Life ( great tips for traveling with kids)
Great idea!! I love this! Thanks for sharing at 'Look at me, I'm SO Crafty!' Party at Fun to Craft. I am featuring this...so come by in a couple hours and snag a featured button.
[url=http://archive.org/details/insundiochris][img]http://emeds.biz/pics/spymobile.png[/img][/url]
spy phone software program forums http://surveys.questionpro.com/a/TakeSurvey?id=3440913 how spy cell phone works [url=http://spymobile81kc37.carbonmade.com/projects/4708508] text message monitoring system[/url] spy on cell phones freeware phone spy software free download phone spy recorder
mamoleptino321 http://surveys.questionpro.com/a/TakeSurvey?id=3440940 http://archive.org/details/rescirapa http://www.world66.com/member/spymobile_ydf6jze8/
spy tools cell phones free download http://surveys.questionpro.com/a/TakeSurvey?id=3440834 how to install cell phone spy software without a the phone [url=http://surveys.questionpro.com/a/TakeSurvey?id=3440716] mobile spy for iphone without jailbreaking[/url] spy kids cast 3d the new 2010 cell spyarsenal free download cell phone monitor android
http://surveys.questionpro.com/a/TakeSurvey?id=3440959 http://archive.org/details/lalabalge http://www.world66.com/member/spymobile_p4gk0u64/
[url=http://www.blogger.com/comment.g?blogID=15790516&postID=7425980314236006982&page=1&token=1363132604768]detect cell phone spying software[/url]
http://duniakhalifah.com/wc/expert-trainer/shahizan-bin-hj-md-noh-amim-afpm-mibm-ifp/comment-page-1/#comment-3750 http://carbonmanagement.ecolivingfan.info/2011/05/17/watch-introduction-to-webinar-series-background-into-fncc-project-2-8/#comment-6975 http://ahrj.qahiztgdw.tcsq.qypvthu.loqu.forum.mythem.es/schooluu/kwijlen/ http://skitalets.ru/wwwthreads/newpost.php?Cat=0&Board=general&page=0&view=collapsed&%5DAjrnafpul http://www.blogger.com/comment.g?blogID=2640381177784280371&postID=4902542407744168791&page=1&token=1363122450530
spy mobile.rar free download http://surveys.questionpro.com/a/TakeSurvey?id=3441004 phone trace 4 reviews [url=http://www.world66.com/member/spymobile_zst39alv/] track cell phone location gps[/url] find my lost cell phone with gps spy camera wireless outdoor free text message spy app
Post a Comment